Chapter 2 Technical Guidelines
This chapter explains the technical details of submitting a blog post or tech note for publication on the rOpenSci website. All in all, your post will be an (R) Markdown file with some tweaks due to the use of Hugo for our website, accompanied by your author metadata as Markdown and optional images, and placed at the right place in our website folder structure; and the general submission and review process uses GitHub Pull Request infrastructure.
This chapter explains the local post drafting, where to find templates, how to use the templates, what our style guide is, how to add your author metadata, how to check your post, how to submit it for our review.
Furthermore, this chapter includes advice on commonly used things like adding an image, a citation, or embedding a tweet in case you need them.
Briefly, the process is:
- Fork the repository (repo) of the rOpenSci website
- Draft your post in R Markdown or Markdown and create or update your author metadata
- Preview and refine your post locally
- Submit via pull request and preview your post
- Community Manager or other staff member reviews your post
- Revise your post in response to review
This chapter links templates for posts and checklists that you can also find in the Appendix.
2.1 Fork the repo and create your post folder
Fork the rOpenSci website repository and create a new branch to work on your post. For help with this aspect of git/GitHub, we recommend happygitwithr and the pull request helpers of the usethis package.
Create a folder YYYY-MM-DD-slug/ (e.g. 2020-01-20-rorcid/) under /content/blog/ or content/technotes/ for a blog post and a tech note, respectively.
Your post source and its images should live in /content/blog/YYYY-MM-DD-slug/ or /content/technotes/YYYY-MM-DD-slug/.
In Hugo speak, we’d say your post is a leaf bundle.
2.2 Start the post from a template
Your post source should be either /content/blog/YYYY-MM-DD-slug/index.md (prepared in Markdown directly) or /content/blog/YYYY-MM-DD-slug/index.Rmd (using R Markdown).
Prepare your post in whichever way is most comfortable for you in your favorite editor in R Markdown or Markdown by starting with templates we provide. Get the templates from this book or from the roblog package.
2.2.1 Get Markdown template
Markdown template to be saved as /content/blog/YYYY-MM-DD-slug/index.md
2.2.2 Get R Markdown template
R Markdown template to be saved as /content/blog/YYYY-MM-DD-slug/index.Rmd
It will need to be knit (e.g. RStudio knit button). Add both index.Rmdand index.mdto your PR.
2.2.3 Get any template from the roblog package
You could get templates from the roblog helper package created for this purpose. Installing roblog allows you to use RStudio Addins to get templates and to run some pre-submission checks.
- Install roblog via
install.packages("roblog", repos = "https://dev.ropensci.org") - Start a new post
- in RStudio, using the roblog Addins
- or at the command-line, using
roblog::ro_blog_post_md()orroblog::ro_blog_post_rmd()
- Save the file as
/content/blog/YYYY-MM-DD-slug/index.mdor/content/blog/YYYY-MM-DD-slug/index.Rmd.
2.3 Walkthrough with code snippets
2.3.1 What goes in YAML
This is the YAML from our post template, with comments to explain some components:
---
slug: "post-template"
title: Post Title in Title Case
# Delete the package_version line below if your post is not about a package
package_version: 0.1.0
authors:
  - Author Name1
  - Author Name2
# Set the date below to the publication date of your post
date: 2019-06-04
# Set categories to technotes if this is a tech note
categories: blog
# Leave topicid blank below; will be set by editor
topicid:
# Minimal tags for a post about a community-contributed package
# that has passed software peer review are listed below
# Consult the Technical Guidelines for information on choosing tags
tags:
  - Software Peer Review
  - packages
  - R
  - community
# the summary below will be used by e.g. Twitter cards
description: "A very short summary of your post"
# If you have no preferred image for Twitter cards,
# delete the twitterImg line below
# Note there is no '/' symbol before 'img' here
# if needed replace blog with technotes
twitterImg: blog/2019/06/04/post-template/name-of-image.png
# 'output' is necessary to obtain index.md
# Do not commit index.html
output:
  html_document:
    keep_md: true
---
NOTE include advice on Twitter cards (in Ch3 Publication and Promotion?) and twitterImg.
2.3.3 Examples
Comparing the raw Markdown to the live posts in these examples might be helpful.
A blog post about a package that has passed software peer review. Compare raw markdown with the live post
A technote. Compare raw markdown with the live tech note
2.3.4 To add an image
If your blog post has any images that are not generated from R Markdown, put them in the same folder as your post source (/content/blog/YYYY-MM-DD-slug/ or /content/technotes/YYYY-MM-DD-slug/).
To reference them in your post, use name-of-image.png.
Insert an image
{{< figure src = "name-of-image.png" width = "200" alt = "this is the alternative text" >}}Insert the same image, but centered and bigger. Notice
widthandclass.{{< figure src = "name-of-image.png" width = "400" alt = "this is the alternative text" class = "center" >}}To insert the image aligned to the right, use
class = "pull-right"In R Markdown, shortcodes need to be html escaped, refer to the template for an example.
If you want to generate images from R Markdown use our R Markdown template in order not to worry about paths.
Every image should be accompanied by alternative text (alt="some text") to make it more accessible to people with disabilities and provide a better user experience for everyone.
The alternative text should convey the meaning or content that is displayed in the image.
Refer to this tutorial for details on what should go in alternative text.
2.3.5 To add a citation
To add citations, refer to them in the body of your post:
Citation of the primary literature[^1].
Citation of an R package[^2].
Citation of a website[^3].
And list your sources at the bottom of your post:
[^1]: Sciaini, M., Fritsch, M., Scherer, C., & Simpkins, C. E. (2018). NLMR and landscapetools: An integrated environment for simulating and modifying neutral landscape models in R. Methods in Ecology and Evolution, 9(11), 2240-2248. <https://doi.org/10.1111/2041-210X.13076>
[^2]: Elin Waring, Michael Quinn, Amelia McNamara, Eduardo Arino de la Rubia, Hao Zhu and Shannon Ellis (2019). skimr: Compact and Flexible Summaries of Data. R package version 2.0.2. https://CRAN.R-project.org/package=skimr
[^3]: Hugo static site generator. https://gohugo.io/
2.3.5.1 How to find citation text for a package or article
To get the citation for an R package, run citation("packagename").
To get the citation for an article, you can use the RStudio Addin for rcrossref, or get the citation from a paper’s DOI by running e.g.
rcrossref::cr_cn("10.1111/2041-210X.13076", format="text", style="apa")

[1] "Sciaini, M., Fritsch, M., Scherer, C., & Simpkins, C. E. (2018). NLMRandlandscapetools: An integrated environment for simulating and modifying neutral landscape models inR. Methods in Ecology and Evolution, 9(11), 2240–2248. doi:10.1111/2041-210x.13076"
To get the citation for an article in Google Scholar, find the article, click the quote symbol (in search results under the article) to open the “Cite” window, and copy the APA style text.
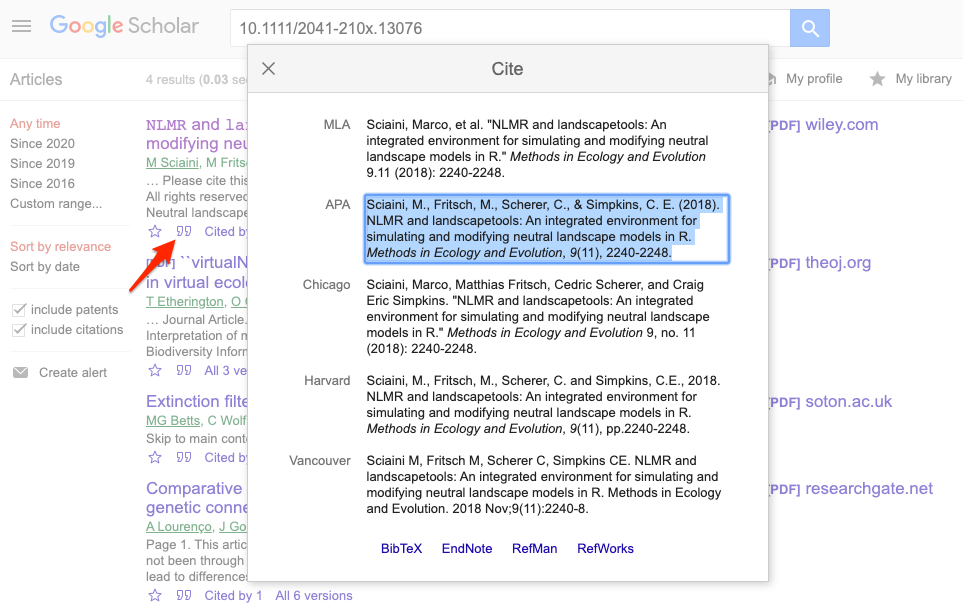
Figure 2.1: Get a citation from Google Scholar.
2.3.6 To add a tweet
Use a Hugo shortcode to embed a tweet using its ID e.g. {{< tweet 1138216112808529920 >}}. In R Markdown, shortcodes need to be html escaped, refer to the template for an example.
2.3.7 Don’t use html widgets
We’ve decided against featuring html widgets (DT, leaflet, etc.) in posts because
their JS and CSS could clash with our website’s JS and CSS;
using an iframe to embed them, setting the correct width/height is tricky.
If you really want to show an html widget, consider publishing it elsewhere and linking it from the blog post.
2.4 Style guide
- For formatting of package names, functions, and code, follow the tidyverse style guidance. Format package names as regular text.
- Use ### or #### to format headings in your post; larger sizes don’t look good. Note long headings with #### don’t currently wrap well.
- Use title case for the title of your post; use sentence case for headings inside the post.
- ‘rOpenSci’ not ‘ROpenSci’
- When adding links to your post, use relative instead of absolute URLs e.g.
/blog/instead ofhttps://ropensci.org/blog/. - Use Hugo shortcodes (not html) to add images, tweets, gists etc.
- In R Markdown wrap Hugo shortcodes between html preserve tags as shown in the template.
- Use informative alternative text for all images.
- Add new line at end of each sentence (makes diffs easier to interpret and easier for editor to suggest specific changes).
2.5 Create or update your author file
2.5.1 Why?
The rOpenSci website has a page listing all authors who have contributed to a blog post, tech note, or presented in a Community Call. A click on your by-line in a post takes the reader to your author page that has links to your online home, possibly your Twitter or GitHub profile(s), and a list of all the content you’ve authored on our site. For staff and leadership team members, editors for software peer review, or members of our Code of Conduct Committee, their rOpenSci title is also listed on their author page.
2.5.2 How?
If you don’t already have an author page, create a folder called yourfirstname-yourlastname in your local copy of roweb2/content/authors/.
You can have accents, middle initials, or hyphens appear in your name if you name your folder appropriately. That can be tricky so we have examples below.
In that folder, create a file called _index.md with information about your online presence.
You can copy this template below (or get it via roblog):
author-file-template.md
At minimum, provide your name and a link or your Twitter, GitHub, or GitLab username. Add your usernames or ID’s without the “@” or the “https:…”). The link field can be your personal website URL, for example.
2.5.3 Examples
This author file, /authors/kelly-obriant/_index.md
… generates Kelly O’Briant’s author page
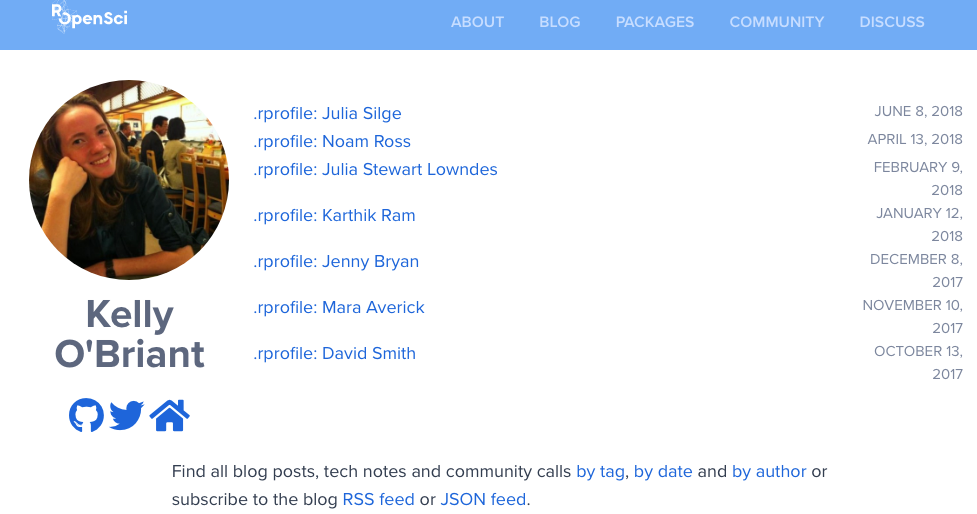
Figure 2.2: Screenshot of Kelly O’Briant’s author page
This author file, `/authors/maëlle-salmon/_index.md’
---
name: Maëlle Salmon
twitter: ma_salmon
bio: rOpenSci Research Software Engineer, Associate editor of rOpenSci Software Peer Review
github: maelle
gitlab: maelle
keybase: maelle_salmon
orcid: 0000-0002-2815-0399
---
… generates Maëlle Salmon’s author page.
For an example of how to name the folder with an accent and initials, see this author file that generates Richèl J.C. Bilderbeek’s author page. The folder name must include accents, initials with periods, and hyphens for spaces, in order to link to their blog content.
Look at other people’s folder names for examples.
2.6 Pre-submission checks
REVISIT THIS after discussing what goes in author and editor checklists
You can use functions in the roblog package to do some automated checks on your post.
ro_lint_md()to check and enforce use of complete alternative descriptions for image, of relative links to rOpenSci website, of Hugo shortcodes for tweets, of lower camelCase for rOpenSci name.ro_check_urls()to check for URLs that might be broken
In the first comment of your pull request submitting a post, please copy-paste the checklist corresponding to your post (hover, a copy-paste button will appear at the top-right corner of the shaded area) and check off items.
2.6.1 Checklist for a post about a peer-reviewed package
* [ ] I have read the content guidelines.
* [ ] I have read the technical guidelines.
* [ ] I used the R Markdown template or Markdown template.
* [ ] I have followed the Style Guide.
* [ ] I created or updated my author metadata with correct folder name.
* [ ] I have added relevant tags after browsing existing tags.
* [ ] I ran `roblog::ro_lint_md()` on index.md (optional).
* [ ] I ran `roblog::ro_check_urls()` (optional).
* [ ] I have added the tags "Software Peer Review", my-packagename, "R".
* [ ] I have added the package-version YAML tag.
* [ ] I have added acknowledgement of the reviewers' work.
* [ ] I have added a link to the software peer review thread.
2.6.2 Checklist for any other post
* [ ] I have read the content guidelines.
* [ ] I have read the technical guidelines.
* [ ] I used the R Markdown template or Markdown template.
* [ ] I have followed the Style Guide.
* [ ] I created or updated my author metadata with correct folder name.
* [ ] I have added relevant tags after browsing existing tags.
* [ ] I ran `roblog::ro_lint_md()` on index.md (optional).
* [ ] I ran `roblog::ro_check_urls()` (optional).
2.7 Submit your draft post
Once you’ve drafted your blog post, you can preview locally using Hugo (recommended) or skip to the next step to make a pull request and preview that.
2.7.1 Local preview with Hugo
Delete /content/blog/YYYY-MM-DD-slug/index.html if present.
If you wish to preview your post locally, as it will appear in our site, you must install Hugo.
To install, refer to Hugo docs or run blogdown::install_hugo().
Then run hugo serve in the repo directory to start a local server on http://localhost:1313.
The version of Hugo used by the rOpenSci web server is defined in netlify.toml.
When this preview looks good to you, you should submit your post as a pull request.
2.7.2 Make a pull request
If using the R Markdown template, knitting index.Rmd will generate both index.md and index.html.
Do not commit index.html but do commit index.Rmd and index.md.
Send a pull request from your fork at least one week prior to the planned publication date to allow time for review. Netlify will start building the new version of the site within seconds and you can preview your changes to make sure everything looks as intended. Otherwise push additional fixes till things look right.

Figure 2.3: Some checks haven’t completed yet.

Figure 2.4: All checks have passed.
A review from blog editor(s) will be automatically requested.